Сделайте свои диалоги такими, как вы хотите

Диалог в программировании - это представление, которое предлагает пользователю какое-либо предупреждение или запрос пользователя выполнить действие, в Android диалоговые окна следуют одному и тому же варианту использования и бывают многих типов, таких как выбор даты, выбор времени, диалоговое окно предупреждений, но есть также возможность создавать и настраивать свои диалоги
В этом уроке я покажу вам, как вы можете создать свой собственный диалог для любого варианта использования, который вы хотите, шаг за шагом с помощью Kotlin.
AlertDialog
В Android диалоговое окно «Предупреждение» - это самый простой тип диалогового окна. Обычно оно состоит из предупреждения и кнопки или двух кнопок, которые обычно имеют значение «Да», «Нет» или «ОК».
Создать диалоговое окно с предупреждением очень просто, код Kotlin ниже делает именно это.
val builder = AlertDialog.Builder(requireActivity())
builder.setMessage("This is an Alert dialog in kotlin")
    .setCancelable(false)
    .setPositiveButton("ok") { dialog, id -> dismiss()}
val alert = builder.create()
alert.show()
DialogFragment
DailogFragment в android является подклассом класса Fragment, но он специализируется на создании диалогов, это ключ для создания любого настраиваемого диалогового окна по вашему выбору.
В следующих разделах мы собираемся создать два настраиваемых диалоговых окна, AgePickerDialog и FruitPickerDialog, используя класс DialogFragment, адаптеры и настраиваемые слушатели событий для взаимодействия с диалоговыми окнами.
AgePickerDialog и FruitPickerDialog
Наш AgePickerDialog предложит пользователю выбрать его / ее возрастную группу, и после выбора AlertDialog отобразит выбор пользователя на экране.
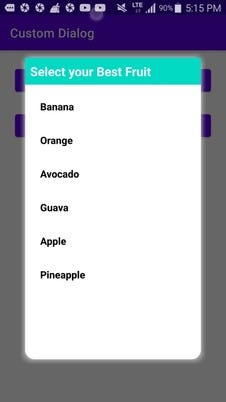
Наш FruitPickerDialog будет делать то же самое, что и AgePickerDialog, но будет предлагать пользователю выбрать фрукты, и при выборе имя фрукта будет отображаться в AlertDialog.
Создайте новый проект студии Android и назовите его «CustomDialogs» или дайте ему имя по вашему выбору, после того, как проект будет создан и построен в первый раз, перейдите к узлу приложения проекта в разделе структуры проекта, затем перейдите к приложению. / java / (имя вашего проекта) в этом узле создайте следующие пакеты: Adapters, Listeners, Models, Dialogs.
Мы будем использовать вышеуказанные пакеты для структурирования нашего решения.
теперь перейдите к своему основному файлу макета деятельности и создайте две кнопки, одна для отображения AgePickerDialog, а вторая кнопка будет для отображения FruitPickerDialog.
ваш основной файл макета деятельности должен выглядеть, как показано ниже
<?xml version="1.0" encoding="utf-8"?>
<androidx.constraintlayout.widget.ConstraintLayout xmlns:android="http://schemas.android.com/apk/res/android"
    xmlns:app="http://schemas.android.com/apk/res-auto"
    xmlns:tools="http://schemas.android.com/tools"
    android:layout_width="match_parent"
    android:layout_height="match_parent"
    tools:context=".CustomDialogActivity">

    <Button
        android:id="@+id/age"
        android:layout_width="0dp"
        android:layout_height="wrap_content"
        android:layout_marginStart="24dp"
        android:layout_marginTop="24dp"
        android:layout_marginEnd="24dp"
        android:text="Select Age Group"
        android:onClick="showSelectAgeDialog"
        app:layout_constraintEnd_toEndOf="parent"
        app:layout_constraintStart_toStartOf="parent"
        app:layout_constraintTop_toTopOf="parent" />

    <Button
        android:id="@+id/fruit"
        android:layout_width="0dp"
        android:layout_height="wrap_content"
        android:layout_marginStart="24dp"
        android:layout_marginTop="24dp"
        android:layout_marginEnd="24dp"
        android:text="Select Fruit"
        android:onClick="showFruitSelectDialog"
        app:layout_constraintEnd_toEndOf="parent"
        app:layout_constraintStart_toStartOf="parent"
        app:layout_constraintTop_toBottomOf="@+id/age" />
</androidx.constraintlayout.widget.ConstraintLayout>
Добавьте приведенный ниже код в свой класс MainActivity
class CustomDialogActivity : AppCompatActivity() {

    // age select button
    lateinit var ageSelect:Button
    //fruit select button
    lateinit var fruitSelect:Button

    override fun onCreate(savedInstanceState: Bundle?) {
        super.onCreate(savedInstanceState)
        setContentView(R.layout.activity_custom_dialog)

        // initializing buttons
        ageSelect = findViewById(R.id.age)
        fruitSelect = findViewById(R.id.fruit)
    }

    //display AgePickerDialog when age select button is clicked
    fun showSelectAgeDialog(v: View){
        val ageSelector:AgePickerDialog = AgePickerDialog()
        ageSelector.show(supportFragmentManager,"age_select")
    }

    //display FruitPickerDialog when fruitSelect button is clicked
    fun showFruitSelectDialog(v: View){
        val fruitSelector:FruitPickerDialog = FruitPickerDialog()
        fruitSelector.show(supportFragmentManager,"fruit_select")
    }
}

MainActivity имеет две функции, которые вызываются при нажатии кнопок в макете.
showSelectAgeDialog () вызывается, когда пользователь нажимает кнопку ageSelect, эта функция просто отображает наш AgePickerDialog.
showFruitSelectDialog () вызывается, когда пользователь нажимает кнопку fruitSelect, эта функция просто отображает наш FruitPickerDialog.
В пакете Models, который мы создали выше, создайте новый класс Kotlin и назовите его AgeGroupModel, этот класс будет использоваться для создания данных возрастной группы, необходимых для AgePickerDialog.
class AgeGroupModel() {

    var label :String = "";
    var startInterval:Int = 0;
    var endInterval:Int = 0;

    constructor(label:String, startInterval:Int, endInterval:Int):this(){
        this.label = label
        this.startInterval = startInterval
        this.endInterval = endInterval
    }
}
В пакете Listeners создайте два интерфейса, которые помогут в обнаружении и обработке события щелчка по элементам наших диалогов.
interface AgeItemSelectListener {
    fun itemClicked(ageGroup:AgeGroupModel, position:Int)
}
В функции itemClicked () интерфейса AgeItemSelectListener мы будем обрабатывать событие щелчка для выбранного элемента возраста.
interface FruitItemListener {
    fun onFruitClicked(fruit:String, position:Int)
}
В функции onFruitClicked () интерфейса FruitItemListener мы будем обрабатывать событие щелчка для выбранного фруктового элемента.
Чтобы иметь возможность отображать список элементов и фруктов AgeGroupModel в их соответствующих диалоговых окнах, нам нужно будет использовать адаптеры RecyclerView, которые будут принимать в качестве параметров список элементов и их соответствующие интерфейсы для прослушивания события щелчка, экземпляры адаптеров затем будут должен быть установлен в RecyclerViews в обоих диалогах для отображения их элементов.
В пакете адаптеров создайте два класса, расширяющие класс RecyclerView.Adapter.
AgeGroupAdapter
class AgeGroupAdapter(private val ageList:ArrayList<AgeGroupModel>, private val listenerAge: AgeItemSelectListener): RecyclerView.Adapter<AgeGroupAdapter.AgeGroupViewHolder>() {

    //initialize itemView for each item
    override fun onCreateViewHolder(parent: ViewGroup, viewType: Int): AgeGroupViewHolder {
        val itemView: View = LayoutInflater.from(parent.context).inflate(R.layout.layout_age_group_item,parent,false)
        return AgeGroupViewHolder(itemView)
    }

    //bind the items to their data
    override fun onBindViewHolder(holder: AgeGroupViewHolder, position: Int) {
        holder.itemPosition = position
        holder.bind()
    }

    // return total number of items to be displayed
    override fun getItemCount(): Int {
        return ageList.size
    }

    //Viewholder class for handling interactions with corresponding item
    inner class AgeGroupViewHolder(itemView: View): RecyclerView.ViewHolder(itemView), View.OnClickListener{
        var label:TextView = itemView.findViewById(R.id.label)
        var group:TextView = itemView.findViewById(R.id.group)
        var itemPosition:Int = 0

        // bind data to item views
        fun bind(){
            itemView.setOnClickListener(this)
            label.text = ageList.get(itemPosition).label
            val ag:String = ageList.get(itemPosition).startInterval.toString()+"-"+ageList.get(itemPosition).endInterval+" years"
            group.text = ag
        }

        //report click events to dialog with listener
        override fun onClick(v: View?) {
            listenerAge.itemClicked(ageList.get(itemPosition),itemPosition)
        }
    }
}
В приведенном выше AgeGroupAdapter есть внутренний класс AgeGroupViewHolder, который расширяет класс RecyclerView.ViewHolder, этот класс описывает представление элемента и метаданные о его месте в RecyclerView, в нашем случае он также используется для установки данных для каждого элемента. ему соответствующий itemView.
Макет для каждого элемента RecyclerView инициализируется в методе onCreateViewHolder адаптера и передается в качестве параметра новому экземпляру AgeGroupViewHolder.
age_group_item_layout.xml
<androidx.constraintlayout.widget.ConstraintLayout xmlns:android="http://schemas.android.com/apk/res/android"
    xmlns:app="http://schemas.android.com/apk/res-auto"
    xmlns:tools="http://schemas.android.com/tools"
    android:layout_width="match_parent"
    android:layout_height="wrap_content"
    android:layout_margin="8dp"
    android:foreground="?attr/selectableItemBackground"
    android:background="@color/white">

    <TextView
        android:id="@+id/label"
        android:layout_width="wrap_content"
        android:layout_height="wrap_content"
        android:layout_marginStart="8dp"
        android:layout_marginTop="8dp"
        android:layout_marginBottom="8dp"
        android:gravity="start|center"
        android:text="Age Label"
        android:textSize="16sp"
        android:textStyle="bold"
        android:textColor="@color/black"
        android:typeface="sans"
        app:layout_constraintBottom_toBottomOf="parent"
        app:layout_constraintStart_toStartOf="parent"
        app:layout_constraintTop_toTopOf="parent" />

    <TextView
        android:id="@+id/group"
        android:layout_width="wrap_content"
        android:layout_height="wrap_content"
        android:layout_marginStart="16dp"
        android:layout_marginTop="8dp"
        android:layout_marginBottom="8dp"
        android:gravity="start|center"
        android:text="Age Group"
        android:textSize="16sp"
        android:textColor="@color/black"
        android:typeface="sans"
        app:layout_constraintBottom_toBottomOf="parent"
        app:layout_constraintStart_toEndOf="@+id/label"
        app:layout_constraintTop_toTopOf="parent" />

</androidx.constraintlayout.widget.ConstraintLayout>
FruitsAdapter
class AgeGroupAdapter(private val ageList:ArrayList<AgeGroupModel>, private val listenerAge: AgeItemSelectListener): RecyclerView.Adapter<AgeGroupAdapter.AgeGroupViewHolder>() {

    //initialize itemView for each item
    override fun onCreateViewHolder(parent: ViewGroup, viewType: Int): AgeGroupViewHolder {
        val itemView: View = LayoutInflater.from(parent.context).inflate(R.layout.layout_age_group_item,parent,false)
        return AgeGroupViewHolder(itemView)
    }

    //bind the items to their data
    override fun onBindViewHolder(holder: AgeGroupViewHolder, position: Int) {
        holder.itemPosition = position
        holder.bind()
    }

    // return total number of items to be displayed
    override fun getItemCount(): Int {
        return ageList.size
    }

    //Viewholder class for handling interactions with corresponding item
    inner class AgeGroupViewHolder(itemView: View): RecyclerView.ViewHolder(itemView), View.OnClickListener{
        var label:TextView = itemView.findViewById(R.id.label)
        var group:TextView = itemView.findViewById(R.id.group)
        var itemPosition:Int = 0

        // bind data to item views
        fun bind(){
            itemView.setOnClickListener(this)
            label.text = ageList.get(itemPosition).label
            val ag:String = ageList.get(itemPosition).startInterval.toString()+"-"+ageList.get(itemPosition).endInterval+" years"
            group.text = ag
        }

        //report click events to dialog with listener
        override fun onClick(v: View?) {
            listenerAge.itemClicked(ageList.get(itemPosition),itemPosition)
        }
    }
}
Выше представлен наш класс FruitsAdapter для FruitPickerDialog, он следует той же структуре, что и AgeGroupAdapter, макет для каждого элемента инициализируется в методе onCreateViewHolder адаптера, и все взаимодействия между элементами и представлением происходят в классе FruitViewHolder.
layout_fruit_item.xml
<androidx.constraintlayout.widget.ConstraintLayout xmlns:android="http://schemas.android.com/apk/res/android"
    xmlns:app="http://schemas.android.com/apk/res-auto"
    android:layout_width="match_parent"
    android:layout_height="wrap_content"
    android:layout_margin="8dp"
    android:background="@color/white"
    android:foreground="?attr/selectableItemBackground">

    <TextView
        android:id="@+id/fruit_name"
        android:layout_width="wrap_content"
        android:layout_height="wrap_content"
        android:layout_marginStart="8dp"
        android:layout_marginTop="8dp"
        android:layout_marginBottom="8dp"
        android:gravity="start|center"
        android:text="Fruit"
        android:textColor="@color/black"
        android:textSize="16sp"
        android:textStyle="bold"
        android:typeface="sans"
        app:layout_constraintBottom_toBottomOf="parent"
        app:layout_constraintStart_toStartOf="parent"
        app:layout_constraintTop_toTopOf="parent" />

</androidx.constraintlayout.widget.ConstraintLayout>
Теперь мы закончим, создав два наших настраиваемых класса диалоговых окон. В пакете Dialogs, который мы создали выше, создайте два класса Kotlin и назовите их AgePickerDialog и FruitPickerDialog соответственно.
Добавьте приведенный ниже код к обоим классам соответственно, код хорошо прокомментирован, чтобы помочь вам понять процесс.
AgepickerDialog.kt
class AgePickerDialog() : DialogFragment() {

    // RecyclerView for listing age groups
    private lateinit var  list: RecyclerView

    // dialog view is created
    override fun onCreateView(inflater: LayoutInflater, container: ViewGroup?, savedInstanceState: Bundle?): View? {
        Objects.requireNonNull(dialog)?.window!!.requestFeature(Window.FEATURE_NO_TITLE)
        return inflater.inflate(R.layout.layout_dialog_fragment_age_select,null,false)
    }

    //dialog view is ready
    override fun onViewCreated(view: View, savedInstanceState: Bundle?) {
        super.onViewCreated(view, savedInstanceState)
        dialog?.window?.setBackgroundDrawable(ColorDrawable(Color.TRANSPARENT))

        // initialize and setup RecyclerView
        list = view.findViewById(R.id.list)
        list.setHasFixedSize(true)
        list.setItemViewCacheSize(20)
        list.layoutManager  = LinearLayoutManager(requireActivity(), RecyclerView.VERTICAL, false)

        // create Arraylist of AgeGroupModel to be displayed in RecyclerView
        val ageList :ArrayList<AgeGroupModel> = ArrayList()
        ageList.add(AgeGroupModel("Kid",1,11))
        ageList.add(AgeGroupModel("Teen",12,17))
        ageList.add(AgeGroupModel("Adult",18,45))
        ageList.add(AgeGroupModel("Old",46,80))
        ageList.add(AgeGroupModel("Ancient",81,110))
        ageList.add(AgeGroupModel("Artifact",111,200))

        // create AgeItemSelectListener to listen to click event on items from the RecyclerView Adapter
        val listenerAge:AgeItemSelectListener = object : AgeItemSelectListener {
            override fun itemClicked(ageGroup: AgeGroupModel, position: Int) {
                //when item in adapter is clicked, show selected age in an AlertDialog
                showSelectedItemAlert(ageGroup,position)
            }
        };

        // create AgeGroupAdapter and pass as parameters the agelist and the AgeItemSelectListener
        val adapter: AgeGroupAdapter = AgeGroupAdapter(ageList,listenerAge)
        list.adapter = adapter
    }

    private fun showSelectedItemAlert(ageGroup: AgeGroupModel, position: Int){
        val builder = AlertDialog.Builder(requireActivity())
        builder.setMessage(ageGroup.label+" you are")
            .setCancelable(false)
            .setPositiveButton("ok") { dialog, id -> dismiss()}
        val alert = builder.create()
        alert.show()
    }
}
layout_dialog_fragment_age_picker.xml
<FrameLayout xmlns:android="http://schemas.android.com/apk/res/android"
    xmlns:app="http://schemas.android.com/apk/res-auto"
    xmlns:tools="http://schemas.android.com/tools"
    android:layout_width="match_parent"
    android:layout_height="match_parent">

    <androidx.constraintlayout.widget.ConstraintLayout
        android:layout_width="300dp"
        android:layout_height="500dp"
        android:layout_gravity="center"
        android:background="@drawable/rounded_shadow_box">

        <TextView
            android:id="@+id/select_title"
            android:layout_width="0dp"
            android:layout_height="wrap_content"
            android:background="@color/teal_200"
            android:padding="8dp"
            android:text="Select your age Group"
            android:textColor="@color/white"
            android:textSize="20sp"
            android:textStyle="bold"
            app:layout_constraintBottom_toTopOf="@+id/list"
            app:layout_constraintEnd_toEndOf="parent"
            app:layout_constraintStart_toStartOf="parent"
            app:layout_constraintTop_toTopOf="parent" />

        <androidx.recyclerview.widget.RecyclerView
            android:id="@+id/list"
            android:layout_width="0dp"
            android:layout_height="0dp"
            android:layout_marginStart="8dp"
            android:layout_marginTop="8dp"
            android:layout_marginEnd="8dp"
            android:layout_marginBottom="8dp"
            app:layout_constraintBottom_toBottomOf="parent"
            app:layout_constraintEnd_toEndOf="parent"
            app:layout_constraintHorizontal_bias="0.0"
            app:layout_constraintStart_toStartOf="parent"
            app:layout_constraintTop_toBottomOf="@+id/select_title"
            app:layout_constraintVertical_bias="1.0" />
    </androidx.constraintlayout.widget.ConstraintLayout>
</FrameLayout>
В методе onViewCreated () нашего AgePickerDialog мы инициализируем и настраиваем RecyclerView и ArrayList AgeGroupModel, которые будут использоваться в качестве элементов в RecyclerView, также инициализируется AgeItemSelectListener, и в нем метод itemClicked () мы вызываем метод showSelectedItemAlert (), который отобразит элемент, выбранный пользователем из RecyclerView, в AlertDialog.
Наконец, мы инициализируем экземпляр FruitsAdapter и передаем ArrayList AgeGroupModel и AgeItemSelectListener в качестве параметров его конструктору.


FruitPickerDialog.kt
class FruitPickerDialog() : DialogFragment() {

    //RecyclerView for displaying fruit names to the screen
    private lateinit var fruitList: RecyclerView;

    // dialog view is created
    override fun onCreateView(inflater: LayoutInflater, container: ViewGroup?, savedInstanceState: Bundle?): View? {
        Objects.requireNonNull(dialog)?.window!!.requestFeature(Window.FEATURE_NO_TITLE)
        return inflater.inflate(R.layout.layout_dialog_fragment_fruit,null,false);
    }

    //dialog view is ready
    override fun onViewCreated(view: View, savedInstanceState: Bundle?) {
        super.onViewCreated(view, savedInstanceState)
        dialog?.window?.setBackgroundDrawable(ColorDrawable(Color.TRANSPARENT))

        // initialize and setup fruitList RecyclerView
        fruitList = view.findViewById(R.id.fruit_list)
        fruitList.setHasFixedSize(true)
        fruitList.setItemViewCacheSize(20)
        fruitList.layoutManager  = LinearLayoutManager(requireActivity(), RecyclerView.VERTICAL, false)

        // create ArrayList of String with fruit names to be displayed in RecyclerView
        val fruits:ArrayList<String> = ArrayList()
        fruits.add("Banana"); fruits.add("Orange"); fruits.add("Avocado")
        fruits.add("Guava"); fruits.add("Apple"); fruits.add("Pineapple")

        // create FruitItemListener to listen to click event on items from the RecyclerView Adapter
        val listener:FruitItemListener = object : FruitItemListener{
            override fun onFruitClicked(fruit: String, position: Int) {
                //when item in adapter is clicked, show selected fruit in an AlertDialog
               showSelectedFruit(fruit)
            }
        }

        // create FruitsAdapter and pass as parameters the fruits and the FruitItemListener
        val adapter:FruitsAdapter = FruitsAdapter(fruits,listener)
        fruitList.adapter = adapter
    }

    private fun showSelectedFruit(fruit:String){
        val builder = AlertDialog.Builder(requireActivity())
        builder.setMessage("you love $fruit")
            .setCancelable(false)
            .setPositiveButton("ok") { dialog, id -> dismiss()}
        val alert = builder.create()
        alert.show()
    }
}
layout_dialog_fragment_fruit_picker.xml
<FrameLayout xmlns:android="http://schemas.android.com/apk/res/android"
    xmlns:app="http://schemas.android.com/apk/res-auto"
    xmlns:tools="http://schemas.android.com/tools"
    android:layout_width="match_parent"
    android:layout_height="match_parent">

    <androidx.constraintlayout.widget.ConstraintLayout
        android:layout_width="300dp"
        android:layout_height="500dp"
        android:layout_gravity="center"
        android:background="@drawable/rounded_shadow_box">

        <TextView
            android:id="@+id/select_title2"
            android:layout_width="0dp"
            android:layout_height="wrap_content"
            android:background="@color/teal_200"
            android:padding="8dp"
            android:text="Select your Best Fruit"
            android:textColor="@color/white"
            android:textSize="20sp"
            android:textStyle="bold"
            app:layout_constraintEnd_toEndOf="parent"
            app:layout_constraintStart_toStartOf="parent"
            app:layout_constraintTop_toTopOf="parent" />

        <androidx.recyclerview.widget.RecyclerView
            android:id="@+id/fruit_list"
            android:layout_width="0dp"
            android:layout_height="0dp"
            android:layout_marginStart="8dp"
            android:layout_marginTop="8dp"
            android:layout_marginEnd="8dp"
            android:layout_marginBottom="8dp"
            app:layout_constraintBottom_toBottomOf="parent"
            app:layout_constraintEnd_toEndOf="parent"
            app:layout_constraintStart_toStartOf="parent"
            app:layout_constraintTop_toBottomOf="@+id/select_title2" />
    </androidx.constraintlayout.widget.ConstraintLayout>

</FrameLayout>
В методе onViewCreated () нашего FruitPickerDialog мы инициализируем и настраиваем RecyclerView и ArrayList of String с названиями фруктов, которые будут использоваться в качестве элементов в RecyclerView, также инициализируется FruitItemListener
, и в нем onFruitClicked (), мы вызываем метод showSelectedFruit (), который отображает имя плода, которое пользователь выбрал из RecyclerView в AlertDialog.
Наконец, мы инициализируем экземпляр FruitsAdapter и передаем ArrayList имен фруктов и FruitItemListener в качестве параметров его конструктору.

Вывод
В этом уроке мы создали наши настраиваемые диалоги с классическим вариантом использования, который выбирает элементы в диалоговом окне или проверяет действие, но на самом деле вы можете сделать гораздо больше с DialogFragment в Android, так что позвольте своему воображению разгуляться и счастливому кодированию .