В этом приложении я попытаюсь объяснить, как реализовать живой поиск в реагирующем приложении с помощью Rick & Morty Api.
- Создайте React-приложение:
$ npx create-react-app app-name
- Установка интерфейса Axios и материалов
$ npm i -save axios @material-ui/core
После очистки приложения от заданных по умолчанию страниц вы должны начать создавать свой первый компонент, в этом случае мы начнем создавать компонент навигационной панели.
Сначала создайте папку и назовите ее компоненты в папке src.
затем создайте новый файл и назовите его Appbar.js, это будет наш компонент панели навигации.
скопируйте и вставьте приведенный ниже код, и теперь ваш компонент готов к использованию в вашем приложении.
import React from 'react';
import AppBar from '@material-ui/core/AppBar';
import Toolbar from '@material-ui/core/Toolbar';
import Typography from '@material-ui/core/Typography';
import InputBase from '@material-ui/core/InputBase';
import { fade, makeStyles } from '@material-ui/core/styles';
import SearchIcon from '@material-ui/icons/Search';
import IconButton from '@material-ui/core/IconButton';
import MenuIcon from '@material-ui/icons/Menu'
const useStyles = makeStyles((theme) => ({
  root: {
    flexGrow: 1,
    paddingBottom : 20,
  },
  menuButton: {
    marginRight: theme.spacing(2),
  },
  title: {
    flexGrow: 1,
    display: 'none',
    [theme.breakpoints.up('sm')]: {
      display: 'block',
    },
  },
  search: {
    position: 'relative',
    borderRadius: theme.shape.borderRadius,
    backgroundColor: fade(theme.palette.common.white, 0.15),
    '&:hover': {
      backgroundColor: fade(theme.palette.common.white, 0.25),
    },
    marginLeft: 0,
    width: '100%',
    [theme.breakpoints.up('sm')]: {
      marginLeft: theme.spacing(1),
      width: 'auto',
    },
  },
  searchIcon: {
    padding: theme.spacing(0, 2),
    height: '100%',
    position: 'absolute',
    pointerEvents: 'none',
    display: 'flex',
    alignItems: 'center',
    justifyContent: 'center',
  },
  inputRoot: {
    color: 'inherit',
  },
  inputInput: {
    padding: theme.spacing(1, 1, 1, 0),
    paddingLeft: `calc(1em + ${theme.spacing(4)}px)`,
    transition: theme.transitions.create('width'),
    width: '100%',
    [theme.breakpoints.up('sm')]: {
      width: '12ch',
      '&:focus': {
        width: '20ch',
      },
    },
  },
}));
export default function SearchAppBar(props) {
  const classes = useStyles();
return (
    <div className={classes.root}>
      <AppBar position="static" style={{ background: '#61DBA0' }}>
        <Toolbar>
          <IconButton className={classes.menuButton}>
            <MenuIcon/>
          </IconButton>
          <Typography className={classes.title} variant="h6" noWrap>
            Your Titles
          </Typography>
          <div className={classes.search}>
            <div className={classes.searchIcon}>
              <SearchIcon />
            </div>
            <InputBase
              placeholder="Search…"
              classes={{
                root: classes.inputRoot,
                input: classes.inputInput,
              }}
              inputProps={{ 'aria-label': 'search' }}
            />
          </div>
        </Toolbar>
      </AppBar>
    </div>
  );
}

Теперь мы должны создать еще один компонент с именем Childcomponent , в папке вашего компонента создайте файл с именем Childcomponent.js.
Скопируйте и вставьте приведенный ниже код, чтобы теперь ваш компонент был готов к использованию.
import React from 'react';
import { makeStyles,withStyles } from '@material-ui/core/styles';
import Card from '@material-ui/core/Card';
import Grid from '@material-ui/core/Grid';
import Badge from '@material-ui/core/Badge';
import CardHeader from '@material-ui/core/CardHeader';
import CardMedia from '@material-ui/core/CardMedia';
import CardContent from '@material-ui/core/CardContent';
import Avatar from '@material-ui/core/Avatar';
import Typography from '@material-ui/core/Typography';
export default function Childcomponent (props)  {
const StyledBadge = withStyles((theme) => ({
    badge: {
      backgroundColor: props.status === "Alive" ? "#5cb85c" : "#d9534f",
      boxShadow: "0 0 0 3px #fff"
    },
  }))(Badge);


  const useStyles = makeStyles((theme) => ({
    root: {
    },
    media: {
      height: 0,
      paddingTop: '56.25%',
    },
    title : {
      textAlign : 'left'
    },
    avatar: {
      backgroundColor: "#0275d8",
    },
  }));

  const classes = useStyles();

    return (
<Grid item md={3} xs={12} sm={6}>
      <Card className={classes.root}>
      <CardHeader
        avatar={
          <StyledBadge
          overlap="circle"
          anchorOrigin={{
          vertical: 'bottom',
          horizontal: 'right',
          }}
          variant="dot"
        >
        <Avatar alt="Remy Sharp">{props.name.charAt(0)}</Avatar>
      </StyledBadge>
        }
        title={props.name}
        className={classes.title}
      />
      <CardMedia
        className={classes.media}
        image={props.image}
        title="Paella dish"
      />
      <CardContent>
      <Typography variant="caption" display="block" gutterBottom className={classes.title}>
        Species : {props.species}
      </Typography>
      <Typography variant="caption" display="block" gutterBottom className={classes.title}>
        Gender : {props.gender}
      </Typography>
      <Typography variant="caption" display="block" gutterBottom className={classes.title}>
        Origin : {props.origin}
      </Typography>
      </CardContent>
    </Card>
    </Grid>
        );
    }
Третий компонент необходим для разбиения на страницы, как обычно, в папке компонентов создайте новый файл с именем Stepper.js, скопируйте и вставьте приведенный ниже код.
import React from 'react';
import { makeStyles, useTheme } from '@material-ui/core/styles';
import MobileStepper from '@material-ui/core/MobileStepper';
import Button from '@material-ui/core/Button';
import KeyboardArrowLeft from '@material-ui/icons/KeyboardArrowLeft';
import KeyboardArrowRight from '@material-ui/icons/KeyboardArrowRight';
const useStyles = makeStyles({
  root: {
    flexGrow: 1,
    marginBottom : 20,
  },
});
export default function Stepper(props) {
  const classes = useStyles();
  const theme = useTheme();
return (
    <MobileStepper
      position="static"
      className={classes.root}
      steps={1}
      nextButton={
        <Button size="small" onClick={props.next} disabled={props.isNext === null}>
          Next
          {theme.direction === 'rtl' ? <KeyboardArrowLeft /> : <KeyboardArrowRight />}
        </Button>
      }
      backButton={
        <Button size="small" onClick={props.prev} disabled={props.isPrev === null}>
          {theme.direction === 'rtl' ? <KeyboardArrowRight /> : <KeyboardArrowLeft />}
          Back
        </Button>
      }
    />
  );
}
Теперь нам нужно создать наш основной компонент, чтобы мы могли построить нашу страницу. в той же папке создайте новый файл с именем Mycomponent.js, куда мы импортируем все предыдущие компоненты, которые мы уже создали.
import React from 'react'
import Grid from '@material-ui/core/Grid'
import Childcomponent from './Childcomponent'
import Appbar from './Appbar'
import axios from 'axios'
import Container from '@material-ui/core/Container'
import Stepper from './Stepper'
export default class Mycomponent extends React.Component {
constructor (props) {
super (props)
        this.state = {
            items : [],
            api_URL : 'https://rickandmortyapi.com/api/character/?name=',
            nextPage : '',
            prevPage : '',
            isLoaded : false,
            query : ''
        }
    }
fetchDataFromApi (url,query) {

        axios.get(url+query)
        .then(res => {

            this.setState({
                items : res.data.results,
                nextPageLink : res.data.info.next,
                prevPageLink : res.data.info.prev,
                isLoaded : true
            })
        }).catch (err => {
            console.log(err)
        })

    }
componentDidMount()
    {
        this.fetchDataFromApi(this.state.api_URL,this.state.query);
    }
handleOnInputChange = (event) => {
        this.setState({
            query : event.target.value,
            isLoaded : false
        }, () => {
            this.fetchDataFromApi(this.state.api_URL,this.state.query)
        })

      }
nextPage = () => {

        this.fetchDataFromApi(this.state.nextPageLink,'')
    }
prevPage = () => {

        this.fetchDataFromApi(this.state.prevPageLink,'')
    }
render() {
var {items,nextPageLink, prevPageLink} = this.state
          return (
            <Container spacing={3}>
            <Grid item md={12} xs={12}>
            <Appbar search={this.handleOnInputChange}></Appbar>
            </Grid>
            <Grid item md={12}>
            <Stepper
            isNext={nextPageLink}
            isPrev={prevPageLink}
            next={this.nextPage}
            prev={this.prevPage}
            style={{justifyContent: 'flex-end'}}
            />
            </Grid>
            <Grid item container spacing={2}>
             { items.map (item =>
             <Childcomponent
             key={item.id}
             name={item.name}
             status ={item.status}
             species={item.species}
             image={item.image}
             gender={item.gender}
             origin={item.origin.name}
             ></Childcomponent>)}
            </Grid>
            <Grid item md={12}>
            <Stepper
            isNext={nextPageLink}
            isPrev={prevPageLink}
            next={this.nextPage}
            prev={this.prevPage}
            style={{justifyContent: 'flex-end'}}
            />
            </Grid>
            </Container>
         );
    }
}
этот компонент имеет другую функцию, чтобы сделать живой поиск API.
чтобы запустить приложение, перейдите в файл App.js, импортируйте основной компонент, ваш App.js должен выглядеть так.
import React from 'react';
import './App.css';
import Mycomponent from './components/Mycomponent'
function App() {
  return (
    <div className="App">
     <Mycomponent/>
    </div>
  );
}
export default App;
если вы хотите проверить, работает ли это в вашей командной строке, введите: npm run start.
теперь у вас должно получиться что-то вроде этого:
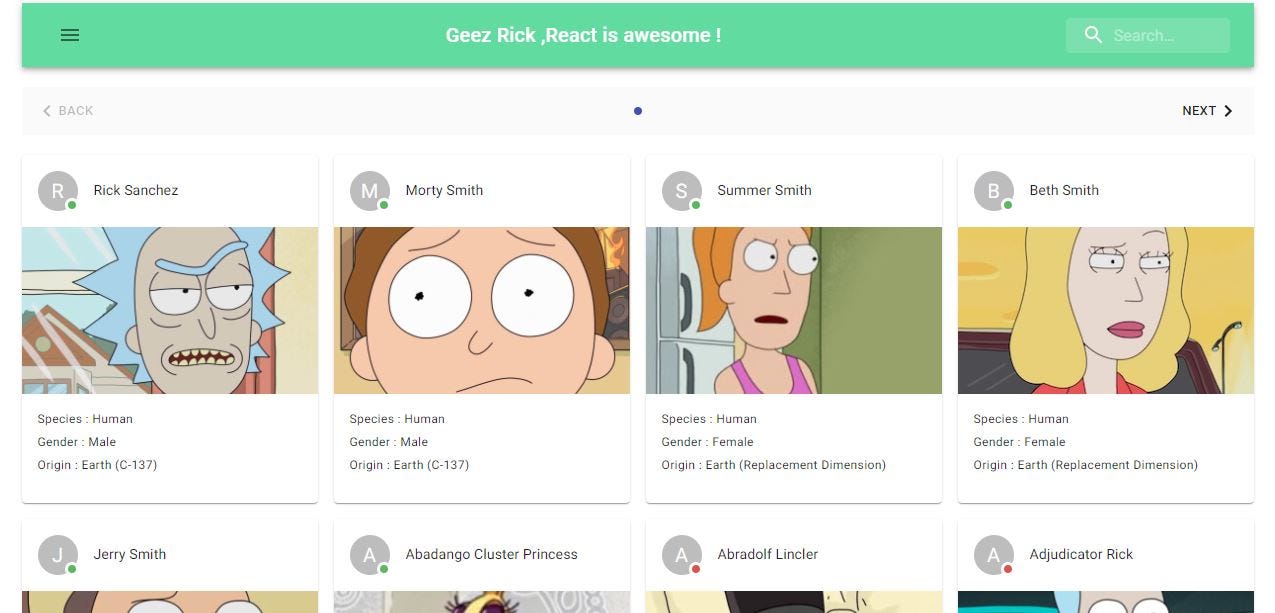
Наслаждаться ! основные функции API живого поиска находятся в Mycomponent.js.
Репозиторий GitHub: https://github.com/benharrimohamed/Rick-and-morty
Предварительное приложение: https://benharrimohamed.github.io/Rick-and-morty/